Thứ Năm, 26 tháng 11, 2015

How To Flashing Asus Zenfone 5

How To Flashing Asus Zenfone 5 - Home Android Will Share Tutorial Flashing Asus Zenfone 5. Bootloop on zenfone 5 can occur for several reasons, one of which is the android system work especial in phone Asus Zenfone 5 you. Hallmark traits zenfone 5 which bootloop is not able to enter on the menu (loading continues on the boot time) or at boot time image appears USB.
http://homeandroidapk.blogspot.com/

Solutions for bootloop is to Flashing, Here is how to Flashing Asus Zenfone 5:

Preparing tools:

  • Intel USB Driver
  • ADB Fastboot tool
  • Download Firmware Zenfone 5 Make sure Type Firmware, you like WW, TW, CN or CHT, (see the cardboard back of your mobile phone is in near Barkot code so that no one download)
  • Laptop / Computer
How To Flashing Asus Zenfone 5:

First Step :
  1. Install USB drivers that have been downloaded earlier to completion
  2. Extracts ADB fastboot tool
  3. Rename firmware that you downloaded earlier, eg UL-ASUS_T00F-WW-1.14.40.50-user, changed into the "user" (for easy on-process cmd in the Step Three:)
  4. Then save firmware inside the folder ADB fastboot tool 
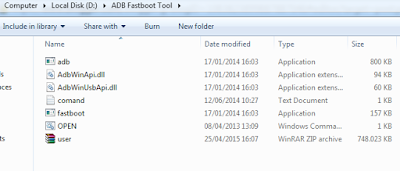
    http://homeandroidapk.blogspot.com/
Second step:
  1. Turn off Handphone Asus Zenfone your.
  2. Sign in to Mode "Zenfone Fastboot Mode" by pressing Power Button + Volume Up simultaneously
  3. After there is a menu Zenfone Fastboot mode, Select the menu recovery
  4. Wait until the image appears robot android that reads "nothing command"
  5. Then press and hold the Button Volume Up + Button Volume Down simultaneously, Then release the Button Volume Up (hold the button down) to get into the mode "Android System Recovery"
  6. After entering in mode Android system recovery select the menu "apply update from adb"
  7. If already means you are ready to continue the next phase.
Step Three:
  1. Connect the Handphone Asus Zenfone 5 your into Laptop / PC.
  2. Open the folder ADB fastboot tool, and then click on file "Open" (next enter CMD)
  3. Once entered into CMD, type a "adb devices" (without the quotes).
  4. If you have successfully will display code number, serial Asus Zenfone 5 as the picture below.
     
  5. If you already such, later with type "adb sideload user.zip" without quotes (user.zip is name the firmware that had been in change and already in the put in an ADB fastboot folder tools)
  6. Wait process up to 100% and really finish (do not unplug the USB) 
    http://homeandroidapk.blogspot.com/
  7. If prosess already completed later your phone will memprosess installation firmware
  8. And if the installation process, firmware is successful then you will enter back into android system recovery mode
  9. After that select the menu "Reboot System Now"
  10. Congratulations Asus Zenfone 5 you have no bootloop again and such new.
NB: If the reboot process zenfone 5 you remain, life Trying to do with the charger If you have entered into the stage of charging try you press button power until, zenfone 5 you, light up again.

How to Root Samsung Galaxy E5 Duos SM-E500H

How to Root Samsung Galaxy E5 Duos SM-E500H - Smart phones Samsung Galaxy E5 Duos SM-E500H already using the Android operating system v4.4.4 (KitKat). Samsung Galaxy E5 is powered by a processor powerful Quad-core has a speed of 1.2 GHz. Vendor Samsung uses 1.5 GB of RAM on the Samsung Galaxy E5, so that the performance of the kitchen runway Samsung Galaxy E5 can work optimally

http://homeandroidapk.blogspot.com/

Smartphone, Samsung Galaxy E5 has a camera, the primary resolution, quite large: 8 MP, the equivalent of 3264 x 2448 pixels and has been supported by the features autofocus camera is used to detect the focal point of the object about to be targeted and will only be focussed to a focal point, LED flash will help, the current lighting users Samsung Galaxy E5 was taking pictures in low light or at nightGeo-tagging feature to determine the place and time when the image capture takes place, touch focus means that the user can set the Samsung Galaxy E5 fikus point to suit his own, Face Detection to detect faces so that later the images clearly visible face, That brief specifications of Samsung Galaxy E5 - E500M. How to Root Samsung Galaxy E5 follows below:

 Preparing tools:
  How to Root Samsung Galaxy E5:
  1. Turn off Handphone you. 
  2. Entered into download mode, how to press and hold the Volume Down + Home + Power for 5-8 seconds.
  3. In download mode later on you will see a warning triangle are yellow press button, Volume Up to continue.  
    http://homeandroidapk.blogspot.com/
  4.  Open the Odin application in PC (which was downloaded earlier along with root file).
  5. Connect your device to PC.
  6. If connected then will display a message ADDED in message box of Odin, if not check that drivers have been installed correctly or not. 
    http://homeandroidapk.blogspot.com/
  7.  After that click button PDA in Odin, then locate the file CF-Auto-Root.tar (which was downloaded earlier
    http://homeandroidapk.blogspot.com/
  8. Then click the Start button.  
    http://homeandroidapk.blogspot.com/
  9.  Wait until the process finishes running, less than about 30 to 1 minutes.
  10. After the process is complete it will display a notification in Odin mark Green Box with the writing PASS
    http://homeandroidapk.blogspot.com/
  11.  After the reboot Handphone,you.
  12. Unplug Samsung E5 your from a PC. 
  13. After power up checks on the menu, whether it has been installed application SuperSU. If you already meant the rooting process successfully. 
    http://homeandroidapk.blogspot.com/
  14.  Check using the Root Checker application Samsung Galaxy E5 To ensure you've actually succeeded in the root.

How To Flash Asus Zenfone 2 via ADB sideload

How To Flash Asus Zenfone 2 via ADB sideload - Sometimes a flash is done on the phone when we can not live or can be called also bootloop. And this bootloop be in because because we were too over our android modify such work especial system in it and it is causing us fail to boot android / bootloop. Then the solutions to overcome them is by doing Flashing on Asus Zenfone 2. This time Home Android will share Tutorials Flashing Asus Zenfone 2

http://homeandroidapk.blogspot.com/

Preparing tools:
 How To Flash Asus Zenfone 2: 
  1. Turn off Zenfone 2 you. 
  2. Sign in recovery mode.
  3. Select the applying updates from ADB.
  4. Connect to Asus Zenfone 2 to your PC / laptop via USB cable.
  5. Open CMD on Windows (PC) (in the same folder where ADB is located). 
  6. Check the connection with the device type adb if the connection is successful then the device will be detected. 
  7. Type in adb sideload file.zip (file.zip = please adjust the name of the firmware file that you downloaded earlier).
  8. Wait until the process is complete.
Congratulations Asus Zenfone 2 phone now you're back to factory settings or rather back to the original settings.   

How To Flashing Infinix Hot 2 X510

How To Flashing Infinix Hot 2 X510 - This time Home Android will share the firmware, and tutorial how to flashing Infinix hot2 Hot2 X510, Infinix is a new product in Indonesia but what if you Infinix phone suddenly experiencing bootloop or force close applications and other software problems, take it easy do not worry because by doing this Handphone you will return to normal as the initial buying, This method has been tried and successfully without any problems, firmware which I possess for this android version 5.1,  This method is also able to cope Handphone Infinix hot 2 hardbrick or the total dead, okay immediately see how below.
http://homeandroidapk.blogspot.com/

Preparing tools:

How to install the driver:
Search for files named installdriver.exe click two times the wait for it to finish, then install as well usb (Just click install 2 times) vcom, after the driver is installed plug the Handphone by pressing the button volume up or down until the notification appears right corner.

How To Flashing:
  1. Extract the firmware and extract also Infinix flashtool
  2. Make sure the battery is at least 50%, then Turn off Handphone
  3. Run Infinix flashtool.exe (for win 7, right-click Run as administrator)
  4. Click Browser and content from the scatter in the firmware folder downloaded earlier 
    http://homeandroidapk.blogspot.com/
  5. Click Start
  6. Connect Handphone to PC / laptop in the situation Dead
  7. Will the process of red-green-yellow ungu-, wait until it comes out green circle OK 
    http://homeandroidapk.blogspot.com/
  8. Try to turn on you Handphone, Wait for about 15 minutes
  9. Done
NB: IF THERE IS A FAILURE OR LIABILITY IS NOT OUR PROBLEM

How to Root Samsung Galaxy Young 2 SM-G130H

How to Root Samsung Galaxy Young 2 SM-G130H - At this opportunity the Home Android will discuss tutorial how to root samsung galaxy young 2 SM-G130H, This tutorial has been tested on mobile phone and managed 100% work without any constraint,


Preparing tools:

  • Samsung USB Driver, extract and install on PC
  • Odin v307, then install it on your PC
  • kernel G130h (just save it file with format .tar in the directory PC.)
  • iRoot, then install it in PC.
  • Enable USB Debugging on your phone. Do I go to the menu Settings> About Device> Press the version number / Build number repeatedly until the notice "you are now a developer"
  • Back to the settings menu will appear Developer New Options open and Checklist USB Debugging.
  • Sign in to download menu, how to turn off the phone then press and hold simultaneously the Volume buttons Down + Home + Power.
  • It will then appear warning triangle yellow press Volume Up to continue.
Install kernel / kernel update:
  1. Open Odin v307
  2. Then connect the phone to a PC using a USB cable.
  3. Wait until Odin detects the device. If the form ID: COM turns into blue / yellow and on the message box appears Added, meaning that the device successfully detected Odin.
  4. Then press the PDA button then browse kernel G130H already saved in the directory PC earlier.
  5. At the option make sure the Auto Reboot and F. Reset Time in checklist whereas others ignore.
  6. Click the Start button to start, wait for it to finish.
  7. After the process is complete, it will display PASS on the top box Odin and the phone will restart automatically. 
    http://homeandroidapk.blogspot.com/
  8. Unplug the phone from the data cable which is stuck into PC.
How To Rooting:
  1. Open Odin v307
  2. Connect again phone to the PC using a data cable.
  3. Wait iRoot application detects the device.
  4. After it is detected press button ROOT green colored below. 
    http://homeandroidapk.blogspot.com/

    http://homeandroidapk.blogspot.com/
  5. Wait until the rooting process is completed.
  6. Then the phone will reboot automatically. 
    http://homeandroidapk.blogspot.com/
  7. After the flaming re-check whether, in phone menu has been installed applications KingUser? 
    http://homeandroidapk.blogspot.com/
  8. If it is then the root process successfully.

How to Root Lenovo A536 Easily Without PC

How to Root Lenovo A536 Easily Without PC - This time Home Android will share tips for your android phone fans, Lenovo A536, for those users android Lenovo A536, Can try to root following! had a problem with the display android that is so casually? Therefore you will need root tips Lenovo A536 follows, because by doing root in Lenovo A536, you will be easy to customize your android, Be it change the font or typeface or just install applications that need root access, certainly you will get a million benefits when you perform root Lenovo A536.
http://homeandroidapk.blogspot.com/

However, in addition to the many benefits you will get, there are also negative impacts that you will get after root Lenovo A536, one of them if you failed to root Lenovo A536, could be Lenovo A536 will die total alias will be damaged. so,make sure you be careful in performing root Lenovo A536 your.

How to Root Lenovo A536:

  1. Download application Framaroot
  2. Make sure your battery is Lenovo A536 a minimum of 70%, it is to anticipate your Lenovo A536 die when the root.
  3. After the application is installed perfectly, go to the application and select SELECT AN ACTION TO EXECUTE AFTER ROOT and replaced with Install SuperUser.
  4. Then select menu Gandalf, by selecting gandalf, Lenovo A536 you will automatically perform root, Wait a while until the process successfully root your Lenovo A536 Root Process.
  5. After the root is completed, please restart your Lenovo A536 this is done after a notice like this "superuser and su binary installed". soon restarted Lenovo A536 after the message above.
  6. After the Lenovo A536 you live check new application will Appear at Lenovo A536 you with your SuperSU.
  7. Root process Lenovo A536 you are successful and complete.
  8. Do it a variety of interesting things with customization without boundary in Lenovo A536 you.
Thank you for reading our article titled How to root Lenovo A536, and may be useful

How Easy Flash Sony Xperia M C1905

How Easy Flash Sony Xperia M C1905 - At the chance the Home Android will try to give a little tutorial that would be beneficial to his friend all specially For users of Sony Xperia M (c1905).
Before continuing need I remind you again to the way flash between Xperia M single and dual sim same way that distinguishes the firmware only.
Preparing tools:

How To Flash:
  1. Install Flashtool in PC / Laptop.
  2. Then open the C: \ Flashtool \ drivers if you have not installed drivers on your PC / Laptop you first A install drivers
  3. Extract the firmware that had been you downloaded then copy the firmware file (file firmwarebberformat .ftf) extract the results to directories C: \ Flashtool \ firmwares
  4. Open application Flashtool.exe
  5. Click the logo of lightning in the application Flashtool then select Flashmode
  6. Select the the firmware that you have saved earlier and then click OK
  7. After the logo appears next command then connect your Android to PC / laptop using a USB cable with a hold and press the volume down do not let go until the logo disappears.
  8. Wait until the process is completed 100%
  9. Completed